Help Section
Here you can find a variety of fixes to common issues as well as useful information about aspects of the app. If you feel anything else should be added please dont hesitate to contact us using the form at the bottom of the page.
The BasicsTrouble Connecting
Macro Key Set Up
Creating .bat Files (Advanced)
The app introduction should have familiarised you with the basics of the android app however here is a
feature list in case you missed it.
The mouse control in the app is very similar to a keyboard track pad. Drag your finger around to move the mouse, tap to click, tap and hold to enter "drag" mode which will hold down click until you release your tap allowing you to drag items, two finger tap for double click and finally two finger scroll.
The keyboard can be brought up from any page by clicking on the keyboard icon in the bottom left. To use special keys such as ctrl or alt you will need to be on the remote page. From here you can also bring up the keyboard to allow you to perform key combinations like "win+p". You can also press multiple remote keys at once allowing you to "alt-tab" and other useful shortcuts.
The settings page allows you to change certain aspects of the app. Most of these settings concern connectivity. "Toggle Scan" allows you to choose if you would like to scan for available target computers on the network or if you would like to directly connect using one of the IPs entered into "Default IP" or "Secondary IP". "Toggle Connection" allows you to swap between your default and secondary IPs as the target allowing you to have multiple computers saved as target and easily switch between them. Finally "Set Macro Names" allows you to give the macros on the remote page custom names allowing you to name them depending on their function.
Mouse Controls
The mouse control in the app is very similar to a keyboard track pad. Drag your finger around to move the mouse, tap to click, tap and hold to enter "drag" mode which will hold down click until you release your tap allowing you to drag items, two finger tap for double click and finally two finger scroll.
Keyboard Controls
The keyboard can be brought up from any page by clicking on the keyboard icon in the bottom left. To use special keys such as ctrl or alt you will need to be on the remote page. From here you can also bring up the keyboard to allow you to perform key combinations like "win+p". You can also press multiple remote keys at once allowing you to "alt-tab" and other useful shortcuts.
Settings Page
The settings page allows you to change certain aspects of the app. Most of these settings concern connectivity. "Toggle Scan" allows you to choose if you would like to scan for available target computers on the network or if you would like to directly connect using one of the IPs entered into "Default IP" or "Secondary IP". "Toggle Connection" allows you to swap between your default and secondary IPs as the target allowing you to have multiple computers saved as target and easily switch between them. Finally "Set Macro Names" allows you to give the macros on the remote page custom names allowing you to name them depending on their function.
If you are having trouble connecting there could be various reasons. Ensure first that the computer you
wish to control has the desktop app installed and is running. This can be checked by looking for its
icon, circled in red below:

If this is running then ensure your phone is connected to the same WiFi network as the computer you wish to control. If you have done both of these and the app and computer are still failing to communicate you can try option one and continue scanning for the PC each time or option 2 where you give the app a target address to connect to.
final avenue for the "scan" method of connection is to go to your Windows network & internet, this can be done by right clicking on the network icon in the task bar:
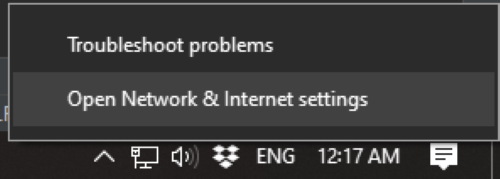
Once at the network settings page click "Change adapter options" as highlighted below:
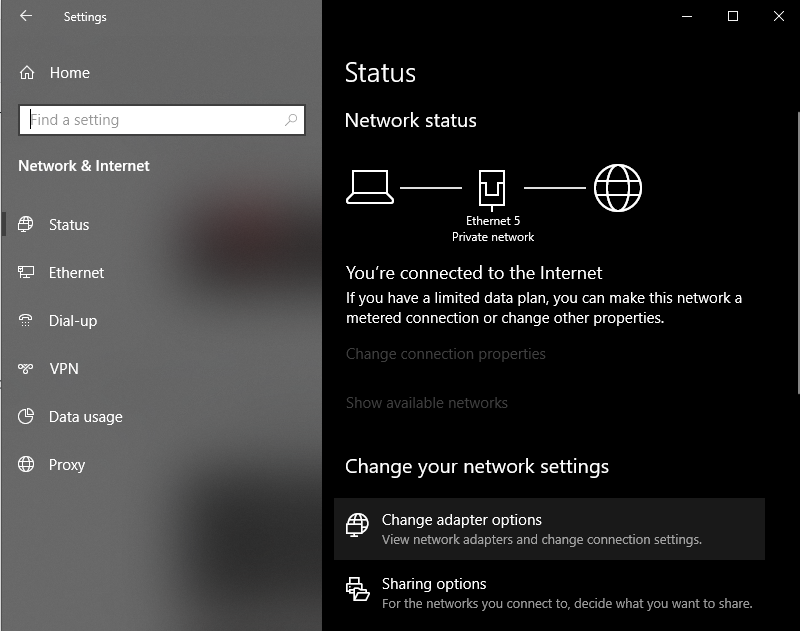
Finally you should be confronted with a page that has network adapters, if only one network adapter is listed this solution is of no use and please skip to the next option. If confronted with two network adapters identify which one you are using (if you are using both please also navigate to the next option) and disable the other by right clicking on the adapter icon and hitting "disable".

If you have any issues with your network after disabling this simply re-enable the adapter and move on to the next option listed below.
The issue of the two devices trying to find each other on the network can be bypassed by giving the app a IP address that it can target directly. This method is also faster at creating a connection so I would recommend it to power users. The first thing to do in this method is to find the IP address of the target PC. This can be done by opening a command prompt, open the start tray and type cmd into the search, command prompt should be the first result. Once the command prompt is open type

This IPv4 Address is the address you need. If you have more than one IPv4 Address show up in this list you need to identify which network adapter is the one connected to the network your android device is connected to. Once you have this IPv4 address open the app on your android device and navigate to the settings page. Once there the first thing you need to do is turn "Toggle Scan" off.

The settings below "Default IP" , "Secondary IP" and "Toggle Connection" should then be accessible. Leave "Toggle Connection" set to default however if you later add a secondary IP you can use this toggle to switch between target computers. Click on the "Default IP" entry to the settings list.
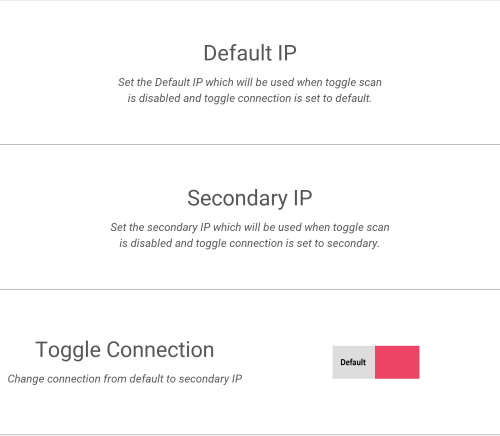
You should then be confronted with a screen with a text entry box at the bottom, type in the IPv4 address from earlier and hit enter, it should display the current ip as the one you just entered.
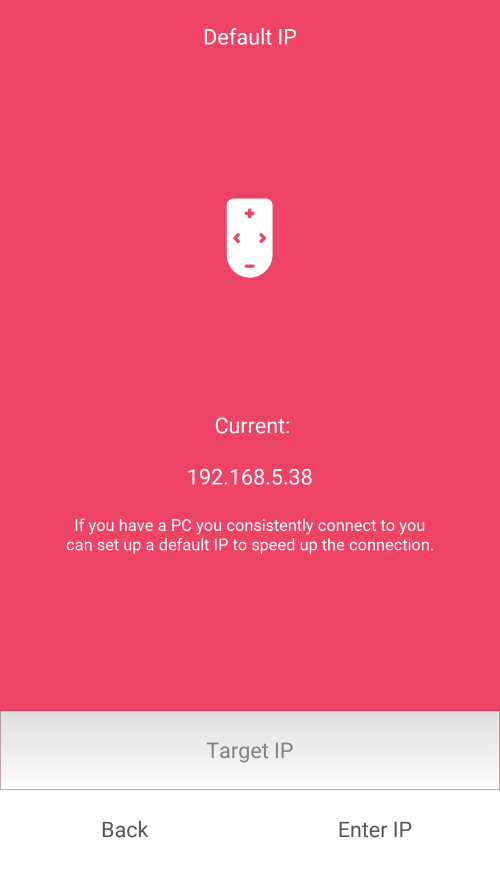
Now back out to the settings screen and hit "Apply". You should then be directed to the main mouse screen where you should be able to move the mouse of your computer around. If you are still unable to connect please double check you have completed all the tasks listed above and in the quick start menu and if problems persist please use the contact form below.

If this is running then ensure your phone is connected to the same WiFi network as the computer you wish to control. If you have done both of these and the app and computer are still failing to communicate you can try option one and continue scanning for the PC each time or option 2 where you give the app a target address to connect to.
Option 1 - Keep Using Scan
final avenue for the "scan" method of connection is to go to your Windows network & internet, this can be done by right clicking on the network icon in the task bar:

Once at the network settings page click "Change adapter options" as highlighted below:

Finally you should be confronted with a page that has network adapters, if only one network adapter is listed this solution is of no use and please skip to the next option. If confronted with two network adapters identify which one you are using (if you are using both please also navigate to the next option) and disable the other by right clicking on the adapter icon and hitting "disable".

If you have any issues with your network after disabling this simply re-enable the adapter and move on to the next option listed below.
Option 2 - Target IP
The issue of the two devices trying to find each other on the network can be bypassed by giving the app a IP address that it can target directly. This method is also faster at creating a connection so I would recommend it to power users. The first thing to do in this method is to find the IP address of the target PC. This can be done by opening a command prompt, open the start tray and type cmd into the search, command prompt should be the first result. Once the command prompt is open type
ipconfig and press enter. You should be presented with a list of details about your network
as shown below:
This IPv4 Address is the address you need. If you have more than one IPv4 Address show up in this list you need to identify which network adapter is the one connected to the network your android device is connected to. Once you have this IPv4 address open the app on your android device and navigate to the settings page. Once there the first thing you need to do is turn "Toggle Scan" off.

The settings below "Default IP" , "Secondary IP" and "Toggle Connection" should then be accessible. Leave "Toggle Connection" set to default however if you later add a secondary IP you can use this toggle to switch between target computers. Click on the "Default IP" entry to the settings list.

You should then be confronted with a screen with a text entry box at the bottom, type in the IPv4 address from earlier and hit enter, it should display the current ip as the one you just entered.

Now back out to the settings screen and hit "Apply". You should then be directed to the main mouse screen where you should be able to move the mouse of your computer around. If you are still unable to connect please double check you have completed all the tasks listed above and in the quick start menu and if problems persist please use the contact form below.
This details the basics of how to set up the macro keys which are located on the remote page of the app.
These are configured on the target computer and are specific to that computer.
You can open up the settings for the target PC by clicking on the system tray icon:

Once clicked a window should pop up, the first setting allows you to change the sensitivity of the mouse when controlled by the app the lines below that allow you to configure the target of the macro keys.
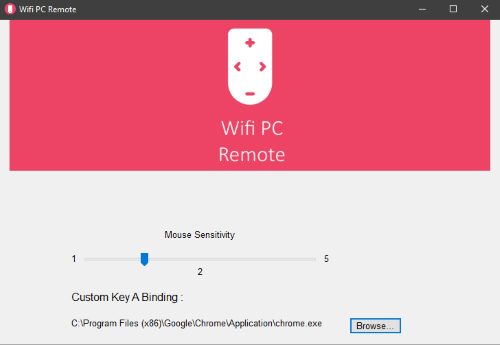
The image above shows the target is currently chrome.exe, once pressed on the app my macro key A will launch chrome. Clicking the "Browse" button will allow you to navigate to the location of applications you wish to start with a macro key or you can assign .bat files which allow you to run Windows scripts to complete a endless variety of functions.

Once clicked a window should pop up, the first setting allows you to change the sensitivity of the mouse when controlled by the app the lines below that allow you to configure the target of the macro keys.

The image above shows the target is currently chrome.exe, once pressed on the app my macro key A will launch chrome. Clicking the "Browse" button will allow you to navigate to the location of applications you wish to start with a macro key or you can assign .bat files which allow you to run Windows scripts to complete a endless variety of functions.
Using .bat files with your macro keys greatly expands the possibilities. This will serve as a very basic
introduction into what you can accomplish with .bat files. These .bat files when executed will run
whatever text is containted within them on the on the windows command line.
To create one of these .bat files all you need is notepad, create a text file and type in the commands
you wish to execute. I have been recently using a command that puts my computer to sleep when activated:
Then save that text file with the extention .bat and you are done!
You now have a .bat file that you can link to the macro keys of the app using the desktop applications interface. This just scratches the surface of what you can do and with a little resarch you can make your own automation scripts that run at the press of a button.
RUNDLL32.EXE powrprof.dll,SetSuspendState 0,1,0Then save that text file with the extention .bat and you are done!
You now have a .bat file that you can link to the macro keys of the app using the desktop applications interface. This just scratches the surface of what you can do and with a little resarch you can make your own automation scripts that run at the press of a button.